


虚拟机安装GitLab 16.0.1实践指南
在现代DevOps实践中,GitLab作为一体化的DevOps平台,提供了从代码托管、版本控制到CI/CD流水线的完整解决方案。本文将详细介绍在虚拟机上安装GitLab 16.0.1版本的过程。
一、实际应用场景背景
在企业级云原生项目实施过程中,自建GitLab环境具有重要意义。特别是在若依微服务项目的完整部署实践中,我们需要管理多个独立的代码仓库,包括Jenkins共享库(shared library)、若依项目源代码、GitOps配置仓库等。通过自建GitLab,我们可以实现代码的统一管理、安全控制和高效的CI/CD流程,满足企业对代码资产的完全掌控需求。
二、部署GitLab的必要性
在若依微服务项目的云原生部署实践中,部署私有GitLab环境具有以下重要意义:
1. 多仓库统一管理
项目涉及多个关键代码仓库,需要统一管理:
- Shared Library仓库:包含Jenkins共享库代码,用于CI/CD流程的标准化
- 若依项目源代码仓库:存储若依微服务框架的源代码,保持与原始仓库结构一致
- GitOps配置仓库:存储Kubernetes部署配置,通过ArgoCD实现GitOps流程
2. 安全性和可控性
- 代码资产完全掌控在企业内部
- 可根据企业安全策略定制访问控制
- 避免第三方平台潜在的安全风险
3. CI/CD流程集成
- 与Jenkins深度集成,实现自动化构建和部署
- 通过Webhook触发自动化流程
- 支持GitOps工作流,与ArgoCD协同工作
4. 网络和性能优化
- 内网访问,提高代码拉取和推送速度
- 避免公网访问的网络延迟和不稳定性
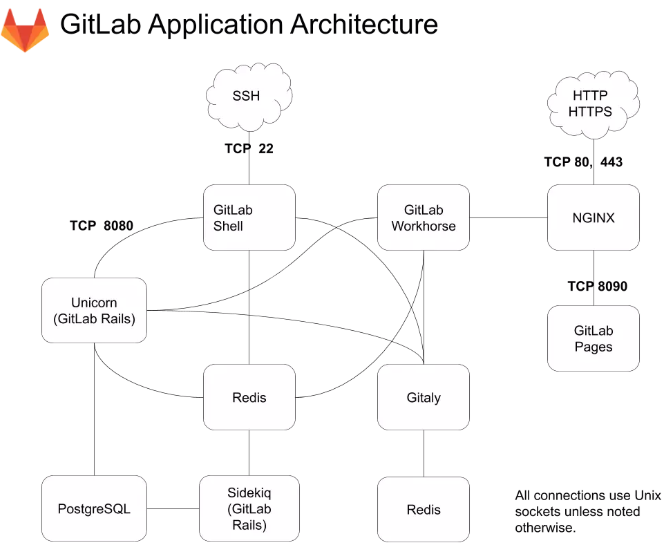
三、GitLab架构简介
GitLab启动后会根据配置定义创建用户和目录,默认依赖的组件在/var/opt/gitlab目录下。GitLab主要组件有:
- Nginx:web访问入口
- postgresql:数据库
- redis:缓存,分发任务
- sidekiq:后台任务,主要负责电子邮件发送,任务来自redis
- unicorn:gitlab主进程
- gitlab-workhorse:反向代理服务器,可处理与主进程unicorn无关的请求
- gitaly:后台服务,处理GitLab发出的所有git调用
四、GitLab 16.0.1虚拟机安装(以CentOS 7为例)
1. 安装基础环境包
yum -y install curl policycoreutils openssh-server openssh-clients
2. 启动sshd
systemctl enable sshd
systemctl start sshd
3. 添加防火墙规则
firewall-cmd --permanent --add-service=http
systemctl reload firewalld
4. 下载并安装软件包
curl -sS https://packages.gitlab.com/install/repositories/gitlab/gitlab-ce/script.rpm.sh | sudo bash
yum install gitlab-ce
如遇到time out,请更换成国内源https://mirrors.tuna.tsinghua.edu.cn/help/gitlab-ce/:
vim /etc/yum.repos.d/gitlab-ce.repo

[gitlab-ce]
name=Gitlab CE Repository
baseurl=https://mirrors.tuna.tsinghua.edu.cn/gitlab-ce/yum/el$releasever/
gpgcheck=0
enabled=1

yum makecache
yum --showduplicates list gitlab-ce
yum install gitlab-ce-16.0.1-ce.0.el7.x86_64 -y
或者可以直接下载相应版本gitlab的rpm包,地址:https://packages.gitlab.com/gitlab/gitlab-ce/
安装过程输出示例:
Loaded plugins: fastestmirror, langpacks
Loading mirror speeds from cached hostfile
 * base: mirrors.aliyun.com
 * extras: mirrors.aliyun.com
 * updates: mirrors.aliyun.com
Resolving Dependencies
--> Running transaction check
---> Package gitlab-ce.x86_64 0:16.0.1-ce.0.el7 will be installed
--> Finished Dependency Resolution

Dependencies Resolved

===============================================================================================================================================================
 Package                              Arch                              Version                                     Repository                            Size
===============================================================================================================================================================
Installing:
 gitlab-ce                            x86_64                            16.0.1-ce.0.el7                             gitlab-ce                            1.2 G

Transaction Summary
===============================================================================================================================================================
Install  1 Package

Total download size: 1.2 G
Installed size: 1.2 G
Downloading packages:
No Presto metadata available for gitlab-ce
gitlab-ce-16.0.1-ce.0.el7.x86_64.rpm                                                                                                    | 1.2 GB  00:03:20
Running transaction check
Running transaction test
Transaction test succeeded
Running transaction
  Installing : gitlab-ce-16.0.1-ce.0.el7.x86_64                                                                                                            1/1
It looks like GitLab has not been configured yet; skipping the upgrade script.

       *.                  *.
      ***                 ***
     *****               *****
    .******             *******
    ********            ********
   ,,,,,,,,,***********,,,,,,,,,
  ,,,,,,,,,,,*********,,,,,,,,,,,
  .,,,,,,,,,,,*******,,,,,,,,,,,,
      ,,,,,,,,,*****,,,,,,,,,.
         ,,,,,,,****,,,,,,
            .,,,***,,,,
                ,*,.


     _______ __  __          __
    / ____(_) /_/ /   ____ _/ /_
   / / __/ / __/ /   / __ `/ __ \
  / /_/ / / /_/ /___/ /_/ / /_/ /
  \____/_/\__/_____/\__,_/_.___/


Thank you for installing GitLab!
GitLab was unable to detect a valid hostname for your instance.
Please configure a URL for your GitLab instance by setting `external_url`
configuration in /etc/gitlab/gitlab.rb file.
Then, you can start your GitLab instance by running the following command:
  sudo gitlab-ctl reconfigure

For a comprehensive list of configuration options please see the Omnibus GitLab readme
https://gitlab.com/gitlab-org/omnibus-gitlab/blob/master/README.md

Help us improve the installation experience, let us know how we did with a 1 minute survey:
https://gitlab.fra1.qualtrics.com/jfe/form/SV_6kVqZANThUQ1bZb?installation=omnibus&release=16-0

  Verifying  : gitlab-ce-16.0.1-ce.0.el7.x86_64                                                                                                            1/1

Installed:
  gitlab-ce.x86_64 0:16.0.1-ce.0.el7

Complete!
五、GitLab配置
1. 主要配置文件和目录
- 代码仓库保存位置:
/var/opt/gitlab/git-data/repositories/ - GitLab主要配置文件:
/etc/gitlab/gitlab.rb
2. 配置GitLab外部访问地址
编辑/etc/gitlab/gitlab.rb,修改GitLab运行外部URL默认的访问地址:
# 修改为你的实际IP地址或域名
external_url 'http://192.168.105.1/'
# 配置备份路径
gitlab_rails['manage_backup_path'] = true
gitlab_rails['backup_path'] = "/data/gitlab/backups"
# 配置git数据目录
git_data_dirs({
    "default" => {
    "path" => "/data/gitlab/git-data"
  }
})
3. 应用配置
修改完毕后,执行以下命令使配置生效:
gitlab-ctl reconfigure
4. 获取初始密码
安装完成后,可以通过以下命令查看初始root密码(该文件在首次重新配置后24小时内自动删除):
sudo cat /etc/gitlab/initial_root_password
输出示例:
# WARNING: This value is valid only in the following conditions
#          1. If provided manually (either via `GITLAB_ROOT_PASSWORD` environment variable or via `gitlab_rails['initial_root_password']` setting in `gitlab.rb`, it was provided before database was seeded for the first time (usually, the first reconfigure run).
#          2. Password hasn't been changed manually, either via UI or via command line.
#
#          If the password shown here doesn't work, you must reset the admin password following https://docs.gitlab.com/ee/security/reset_user_password.html#reset-your-root-password.

Password: fHhHXY8ba6zc3KE9XW1skq0dTiH8b/C3NasH7+vLpOU=

# NOTE: This file will be automatically deleted in the first reconfigure run after 24 hours.
访问GitLab首页,默认账号密码为root和上面显示的初始密码。
六、从Gitee迁移到GitLab
将代码从Gitee迁移到GitLab是一个常见的需求,可以通过以下步骤完成:
1. 准备工作
确保已经安装了Git客户端,并配置好基本的用户信息:
git config --global user.name "Your Name"
git config --global user.email "your.email@example.com"
2. 克隆Gitee仓库
以若依微服务项目为例,从Gitee克隆代码:
# 克隆项目(包含所有分支和标签)
git clone --mirror https://gitee.com/y_project/RuoYi-Cloud.git

# 进入克隆的仓库目录
cd RuoYi-Cloud.git
3. 创建GitLab项目
- 登录GitLab
- 点击"新建项目"
- 选择"创建空白项目"
- 输入项目名称(如ruoyi-cloud)
- 选择项目可见性级别
- 点击"创建项目"
4. 推送代码到GitLab
# 添加GitLab远程仓库
git remote set-url origin http://gitlab.example.com/your-group/ruoyi-cloud.git

# 推送所有分支和标签
git push --mirror

# 返回到正常仓库状态
cd ..
rm -rf RuoYi-Cloud.git
git clone http://gitlab.example.com/your-group/ruoyi-cloud.git
5. 验证迁移结果
- 在GitLab中检查项目文件是否完整
- 验证分支和标签是否都已迁移
- 确认提交历史是否保持完整
七、创建其他关键仓库
除了若依项目源代码仓库外,还需要创建其他关键仓库:
1. 创建Shared Library仓库
# 在GitLab中创建新的空白项目
# 项目名称:shared-library
# 用于存储Jenkins共享库代码
2. 创建GitOps配置仓库
# 在GitLab中创建新的空白项目
# 项目名称:argocd-gitops
# 用于存储Kubernetes部署配置
八、GitLab常用命令
GitLab提供了一系列命令行工具用于管理服务:
gitlab-ctl status:查看gitlab组件状态gitlab-ctl start:启动全部服务gitlab-ctl restart:重启全部服务gitlab-ctl stop:停止全部服务gitlab-ctl reconfigure:使配置文件生效(一般修改完主配置文件/etc/gitlab/gitlab.rb,需要执行此命令)gitlab-ctl show-config:验证配置文件gitlab-ctl uninstall:删除gitlab(保留数据)gitlab-ctl cleanse:删除所有数据,从新开始gitlab-ctl tail:查看服务的日志
九、总结
通过本文的介绍,我们详细了解了在虚拟机上安装GitLab 16.0.1版本的过程。GitLab作为一体化的DevOps平台,不仅提供了代码托管功能,还集成了CI/CD、项目管理等多项功能。在若依微服务项目的云原生部署实践中,自建GitLab环境对于统一管理多个代码仓库(包括Shared Library、若依项目源码、GitOps配置等)、实现安全可控的开发流程以及与ArgoCD协同实现GitOps具有重要意义。合理利用GitLab的各项功能,能够有效支持企业的软件开发和运维工作。
参考资料
- GitLab官方文档
- 虚拟机安装gitlab16.0.1


评论区